


The Simple Guide on How to Use LinkedIn Recruiter and Recruiter Lite

Your company has invested in LinkedIn Recruiter or LinkedIn Recruiter Lite, and you’re ready to manage your talent acquisition process from a single platform of over 700 million users.
While using LinkedIn Recruiter or Recruiter Lite is a mostly intuitive experience, it’s easy to be overwhelmed by how much the platforms offer.
Our goal with this brief guide is to give you some pointers on the basic functions of Recruiter and Recruiter Lite, so you can put them to use immediately.
Let’s dive in.
Step 1 – Creating Projects and Posting Jobs on LinkedIn Recruiter (and Recruiter Lite)
First of all, we are assuming you already have a LinkedIn account.
Projects are designed to help you keep track of candidates throughout the hiring process. But before we start searching for candidates, let’s go over what projects are and how to create them.
According to the LinkedIn Help center, “a project is an organizational workplace within LinkedIn Recruiter and LinkedIn Recruiter Lite used for tracking and managing candidates through the hiring process. All jobs posted in Recruiter or Recruiter Lite are associated with a project.”
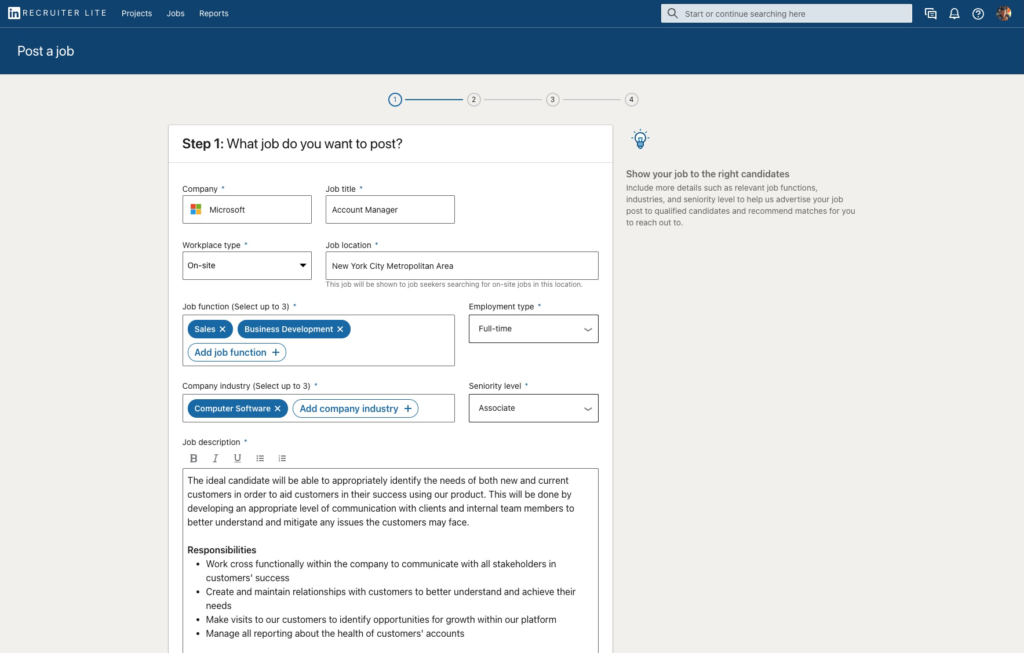
- Once logged into Recruiter (or Recruiter Lite), hover over “Jobs” at the top of the Recruiter homepage. Then click “Post a Job.”
- You’ll have the option to either connect this new job to an existing project, or you can create a new project. Note: You can also post a job by creating a new project, then clicking “Add a job post.”
- If you’re creating a new project, be sure to enter the project name. Some recruiters will simply name this the position they’re trying to fill, though they might modify the project name based on location, skills, etc.
- Fill in the fields as necessary, including project description, the job title, location, your company, and so on, filling in as much as you can. Fields like employment type and seniority level will auto-populate based on the title you’ve entered early but feel free to modify these via the dropdown menu.
- Choose whether your project will be private or public. If private, only members of the project and the Hiring Team can view it.
- Add up to 10 skills in the “+ Add skill” dropdown – simply start typing, and autofill options will appear in the dropdown menu.
- Choose how you’d prefer applicants to apply. Our recommendation, as well as LinkedIn’s, is to allow them to apply with their LinkedIn profile. Without disclosing your email address to applicants, you’ll be able to receive notifications on any updates. The other option is to direct applicants to an external site (perhaps your company’s applicant tracking system or ATS), in which case you must provide the external URL here.
- After clicking continue, you can move into the screening questions page (Step 2), where you can add relevant questions for potential candidates to answer. Screening questions can help you gauge expertise, but the answers can also be used to sort applicants in the system.
- Click continue again, and you’ll be able to enhance your job post in Step 3. Here, you can choose to make your profile visible or not, suggest Skill Assessments, enter tracking pixels, and mention benefits, if any.
- If you’re happy with the job posting thus far, go ahead and preview how the posting will appear to potential candidates.
- Once you’re satisfied, click “Finish” to post your job.
Alternatively, you could create a project based on a search you want to run.
- Sign in to Recruiter or Recruiter Lite, then run your search (more on using the search feature in detail below).
- Once you’ve found the right potential candidate, click on “Save to project” – it will be to the right of their name.
- Click “+ Create new,” enter a project name, and then save and continue.
Step 2 – Running Candidate Searches on LinkedIn Recruiter
You have two options when running a search. You can either run it from the global search bar at the top of the page, or you can search from within the “Talent Pool” tab of any of the projects you’ve created.
Searching from the Global Search Bar (Standard Search)
- Once you’re signed in to LinkedIn Recruiter or Recruiter Lite, simply enter your search terms in the global search bar at the top of the page.
- Select the most relevant job title or select “Search all LinkedIn members” under “Recruiter search” from the dropdown menu.
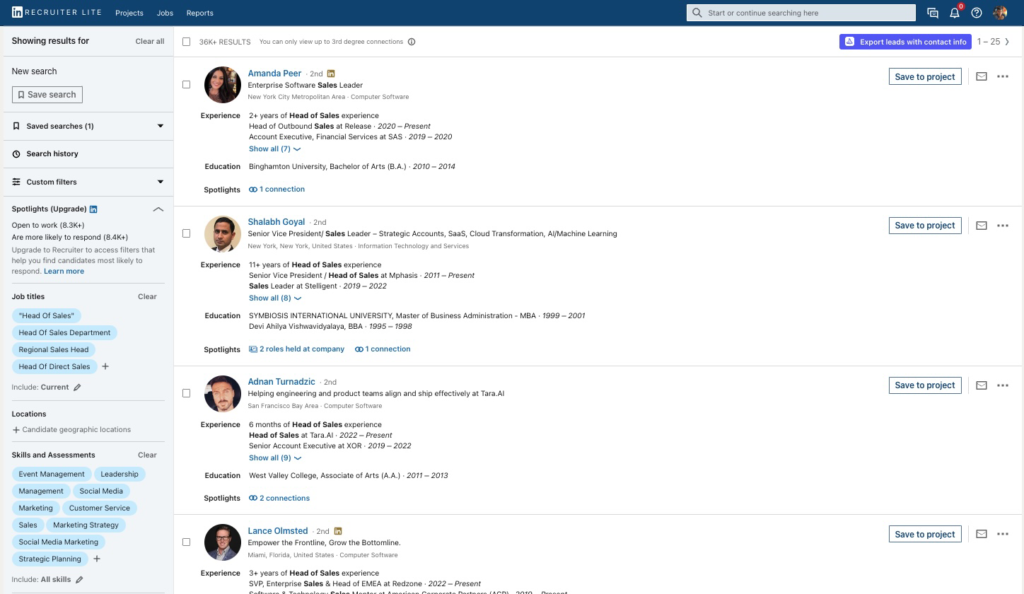
- On the left-hand side, use the search filters to narrow down your search for the right candidates.
Searching from the Global Search Bar (“Ideal Candidate” Search)
When you’ve found an ideal candidate and want to model your search after their specific skills and background, you can use the “ideal candidate” search feature. LinkedIn Recruiter (and Recruiter Lite) will offer similar candidates and prioritize these candidates in your search. Here’s how it works.
- Click the global search bar on top and, on the dropdown menu, choose “Create search from ideal candidate.”
- When the slide-out window appears, enter in the ideal candidate’s name (you can use more than one but try to keep it to less than five).
- When you find the candidate you want to model your search after in the dropdown menu, click on their name.
- Use “Search,” which will run a search with results appearing on the left-hand side matching your ideal candidate’s skills and background.
- You can edit the search filters on the left to fine-tune your search.
Searching from the Talent Pool Tab
- When signed into Recruiter or Recruiter Lite, click Projects (top of the page).
- Select the project you’d like to work within.
- Search results will populate on the left-hand side along with all of the search filters.
- Adjust your search filters as needed. You can filter by location, job title, skills, and more.
- Use the SpotLights feature on the left to find candidates who are more likely to engage.
- Use the Recommended matches tab (to the right of the “recruiter search tab” and to the left of “post a job”) to see AI-driven candidate suggestions based on your searches and previous actions in your project.
- When you find candidates you’re happy with, save them to your pipeline. You can do this by clicking the “save to pipeline” button on the right side of the candidate’s profile.
- To update candidate status in your pipeline, you’ll notice the “save to pipeline” button has been replaced with “change status.” You can use this to update their status as they move through your pipeline.
Step 3 – Two Options for LinkedIn Recruiter Candidate Outreach
Creating projects and finding candidates won’t be enough to fill your open positions. The next and arguably most crucial step is outreach.
There are two approaches you can take.
You can go through every candidate and take down their contact information to conduct your own outreach, or you could use LinkedIn’s InMail system.
Whether you have a high hiring volume or not, the manual process of retrieving every candidate’s relevant contact information is intensive. But we do have a way around that – see option B if you’re the type of recruiter who likes taking outreach into your own hands.
Otherwise, you can use LinkedIn’s InMail system.
Option A – Reach Candidates Through Recruiter and Recruiter Lite
Why use InMail? Well, it’s built right into the LinkedIn platform, and depending on your plan (Recruiter or Recruiter Lite), you’ll have a specified number of free InMails you can use each month.
Once you’ve created your projects and started filling your pipeline with candidates, here’s how to optimize your outreach through LinkedIn.
- Within your project pipeline (the tab to the right of “talent pool”), you can select one or more candidates using the check box just under the “search pipeline” bar.
- Once you’ve checked the box, you will have options to archive, message, change stage, and so on. To start an InMail, click “message.”
- Compose your subject line and InMail.
- If you’d like to save the InMail as a template for use going forward, click “Save as a new template” at the bottom left of the InMail window. Enter the template name and choose whether to allow others in your organization to see it or just you. Click Save when done.
- With the Recruiter mobile app for iOS or Android, you can keep up with candidate contact while on the go, whether composing or responding to InMails, running searches, updating candidates in your pipeline, or doing other simple tasks.
Option B – Export All Candidate Contact Info with Only a Few Clicks
Or, you can skip the InMail process (or supplement it) by exporting LinkedIn candidate contact information.
Exporting this data directly out of LinkedIn may seem out of reach, but with Wiza, we’ve made it easy.
Wiza is a straightforward app that, once you’ve created a free account, allows you to obtain accurate, verified contact information. You can run your search in Recruiter or Recruiter Lite, then download contact data directly through the app as a CSV.
With Wiza’s real-time data point verification, you can get access to over 30 potential data points. And, with live SMTP verification, you can know if an email address is currently active.

Sign up for your free account today and receive 20 email credits and 5 phone credits, on us!
When you’re ready to learn more, please reach out to us on live chat on our website or shoot us an email at hello@wiza.co.


Create prospect lists from Linkedin.
Convert any Linkedin search to an email list ready for outreach.


